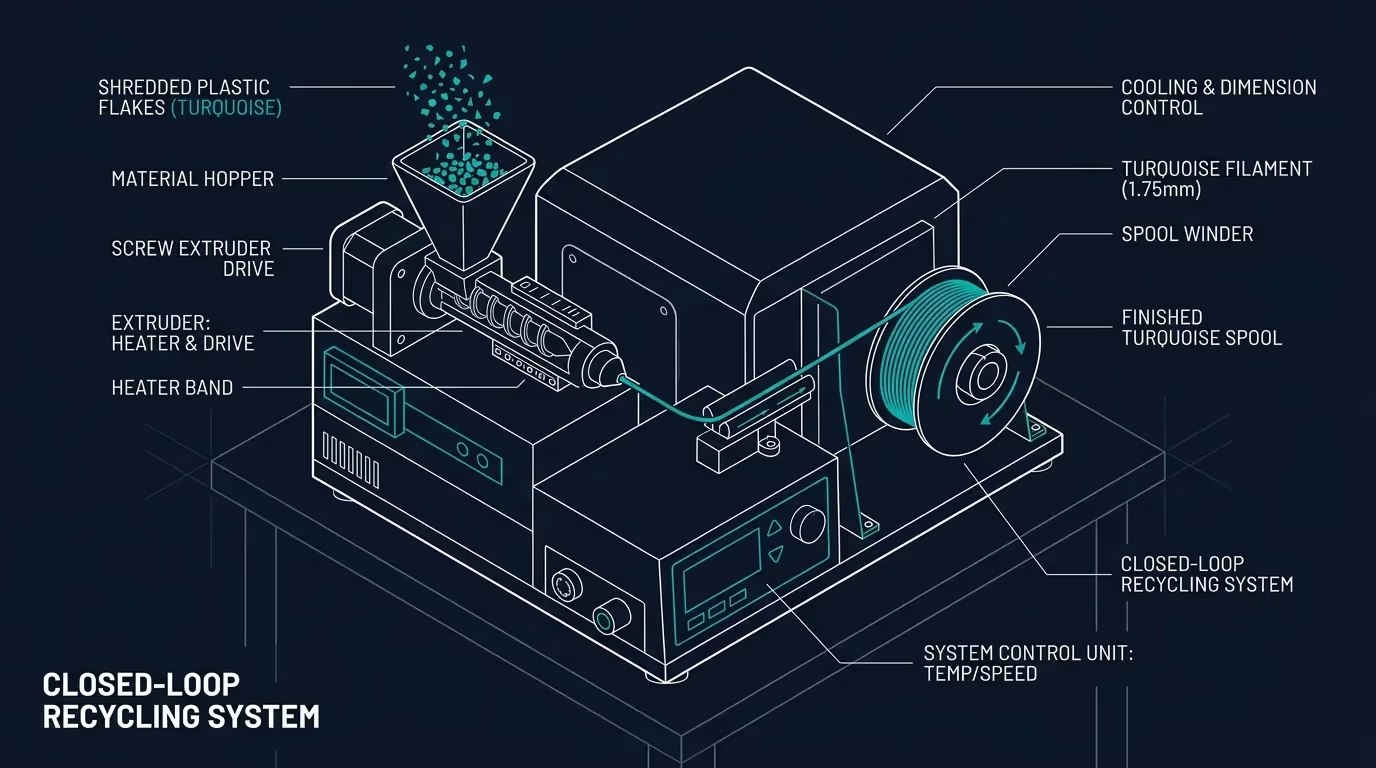
Failed prototypes, rafts, support scaffolding, and purge towers are an inevitable byproduct of additive manufacturing. For print farms, design studios, makerspaces, and university research labs, this cumulative plastic waste is both an environmental burden and a recurring material cost.
Throwing away failed PLA or PETG prints means discarding raw polymer that has only been melted once or twice. With modern compact recycling hardware, you can establish an on-site, closed-loop recycling line that shreds failed prints and re-extrudes them into high-tolerance, production-ready filament spools.
In this comprehensive guide, we walk you through the practical engineering steps required to turn scrap prints back into consistent filament, from sorting and granulating to temperature control and spool winding.
The Four Stages of the Closed-Loop 3D Printing Recycling Workflow
Creating reliable filament is not just about melting plastic—it is about strict quality control across four distinct phases:
[1. Sorting & Cleaning] -> [2. Size Reduction (Shredding)] -> [3. Dehumidification & Drying] -> [4. Precision Extrusion & Spooling]Stage 1: Sorting and Polymer Separation
The single biggest cause of diameter variation, nozzle clogs, and brittleness in recycled filament is cross-polymer contamination.
- Never mix polymers: PLA, PETG, ABS, and TPU have vastly different glass transition points and melting temperatures. Even a 1% contamination of PETG in PLA will produce un-melted inclusions that instantly jam a 0.4mm 3D printer nozzle.
- Color sorting: Separate your scrap by color (clear/white, black, bright hues) or mix similar tones to create consistent batches.
- Contaminant check: Remove brass heat-set inserts, magnets, and support adhesive residue before processing.
Stage 2: Mechanical Size Reduction (Shredding)
Feedstock consistency is essential for steady extrusion. Standard desktop extruders cannot pull in bulky, solid failed prints; the material must be shredded into uniform, flowable flakes between 3mm and 5mm.
A specialized low-speed, high-torque desktop 3D print shredder is specifically engineered for this stage:
- Low-speed cutting: Prevents frictional heating from softening PLA during grinding.
- Integrated classification screen: Ensures that only flakes of the target 3–5mm dimensions pass into the collection bin, while larger pieces are recirculated for re-shearing.
Stage 3: Moisture Control and Dehumidification
Polymers like PLA, PETG, and Nylon are hygroscopic—they absorb ambient humidity directly from the air. If you feed damp flakes into an extruder:
- Water turns into steam inside the high-temperature barrel.
- The steam creates micro-bubbles and foaming inside the extruded filament.
- The steam causes hydrolytic degradation, permanently breaking the polymer chains and making the resulting filament extremely brittle.
Drying Protocol:
- PLA: Dehumidify in a convection oven or hopper dryer at 45°C–50°C for 3 to 4 hours.
- PETG: Dry at 60°C–65°C for 4 to 6 hours.
- Rule of thumb: Extrude immediately after drying or store dried flakes in vacuum-sealed buckets with desiccant packs.
Stage 4: Extrusion, Cooling, and Automatic Winding
This is where the flakes are converted back into a continuous, dimensionally accurate filament strand. Using a dedicated 3D filament extruder, the process requires balancing four parameters:
1. Temperature Profile (Barrel Zones)
A graduated temperature gradient is necessary:
- Feed throat: Keep cool to prevent premature melting and hopper bridging.
- Melt zone: Set according to polymer specs (e.g., 185°C–195°C for recycled PLA; 225°C–235°C for recycled PETG).
- Die nozzle: Calibrated for uniform swell out of the orifice.
2. Screw Speed & Backpressure
A nitrided compression screw provides steady melt homogenization. Maintaining a steady 5–15 RPM ensures consistent volumetric throughput without introducing excessive shear stress into the polymer.
3. Air Cooling vs. Water Bath
As the molten strand exits the nozzle, it must be cooled quickly to freeze its shape without ovality. Dual-fan forced-air cooling tunnels or short water quench troughs stabilize the diameter at 1.75mm ±0.05mm.
4. Puller and Tension-Controlled Spool Winder
A motorized puller synchronizes with a digital optical laser micrometer. If the diameter drifts above 1.78mm, the puller speeds up slightly to draw it down; if it thins below 1.72mm, the puller slows. A traverse arm guides the filament evenly across the spool to prevent overlapping tangles.
Key Best Practices for Virgin-Quality Recycled Filament
- Add 15%–20% Virgin Pellets (The Masterbatch Buffer): Every thermal cycle slightly shortens polymer chain lengths (reducing melt strength). Blending 15% to 20% virgin polymer pellets into your shredded flakes restores molecular elasticity and ensures your 3D prints retain full tensile strength.
- Purge Between Material Changes: Run high-viscosity cleaning compound or high-temp virgin pellets through the extruder barrel whenever switching between PLA and PETG.
- Use a Stainless Steel Nozzle on Your 3D Printer: Recycled filament can occasionally carry trace micro-particulates. A 0.5mm or 0.6mm nozzle reduces the risk of clogs compared to a narrow 0.25mm nozzle.
Equipment Needed to Build Your In-House Recycling Hub
To set up a professional closed-loop 3D printing station, you need three matched pieces of hardware:
| Equipment Stage | Recommended Machine | Function |
|---|---|---|
| Size Reduction | Desktop 3D Print Shredder | Granulates prints and failed supports into 3-5mm uniform flakes |
| Material Drying | Dehumidifying Hopper Dryer | Extracts internal moisture to prevent bubble formation |
| Precision Extrusion | 3D Filament Extruder | Melts, monitors diameter, and spools 1.75mm/2.85mm filament |
Economic and Environmental ROI
Setting up an in-house recycling system delivers clear returns:
- Cost Savings: Virgin specialty filaments (such as carbon-fiber reinforced PLA, high-speed PETG, or custom colors) cost $30–$80 per kilogram. Shredding and re-extruding your own scrap reduces your effective material cost to mere pennies of electricity per spool.
- Zero-Waste Operations: Instead of throwing kilograms of support scaffolding into landfills, your print facility achieves near-100% material utilization.
- Custom Formulations: You can blend custom pigments, glow powders, or structural additives directly into your shredded regrind to create proprietary filament formulations.
Ready to eliminate plastic waste in your 3D printing workshop? Explore the technical specifications of our compact 3D filament extruder and desktop shredding solutions today.